Jaltest Coverage for Bobcat Injector Calibration
Construction site and project managers know that they must first invest in the right off-highway construction equipment to get the job done. You could spend countless hours looking for the right excavator or Bobcat to purchase, further solidifying your financial and emotional investment in the heavy machinery. However, every construction professional also knows that ownership comes with a great deal of responsibility, including diagnostic repairs performed by qualified technicians.
After hundreds of hours of use, it’s normal for any machine to experience wear and tear. For this reason, technicians are used to changing the injectors often. Every time you make these changes, you’ll need to insert the new injectors’ codes in the ECU. Some shops spend a lot of resources sending the machinery to official dealers or purchasing each manufacturer’s OEM software and hardware to perform these injector calibrations. With Jaltest tools from Triad Diagnostic Solutions, you will be able to execute injector calibrations by yourself, saving money and time.
Here is a quick rundown of a Bobcat Injector Calibration:
Step 1
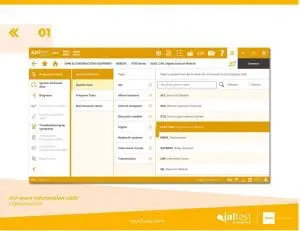
As you can see here with the A700 Series, Jaltest goes beyond the engine and also covers the hydraulic systems, the transmission, and the central computer. From the Diagnostics Menu, you can select the correct system you’re looking to repair or calibrate using the easy-to-navigate dropdown menus. For the sake of Bobcat Injector Calibration, you’ll want to navigate to the DL03, CAN, Engine Control Module.
Step 2
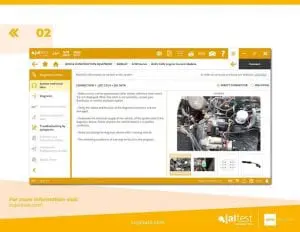
Once inside the Engine Control Module, your techs will be shown exactly how to connect your off-highway kit. They’ll be given step-by-step-instructions and images, as well as troubleshooting guides for how to carry out a manual pin selection.
Step 3
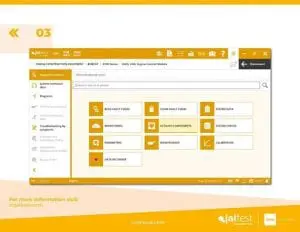
Once the connection has been made to your Bobcat, your tech is then provided a dashboard of diagnostic selections. This includes everything from:
-
- Reading fault codes
- Clearing fault codes
- Accessing system data
- Monitoring
- System checks
- Actuating components
- Accessing parameters
- Maintenance records
- Calibration
- Recorded machine data
To perform the necessary repairs, your techs will need to select Parameters and navigate to Injector Codes and then Modify Parameters.
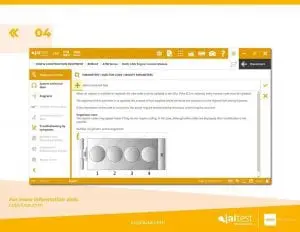
Step 4
Once inside the Modify Parameters module, you can see a complete diagram of the cylinders and their arrangement. You will also find information on the objectives of this operation. To move forward with your repair, your tech should click on the “i” icon next to the diagram.
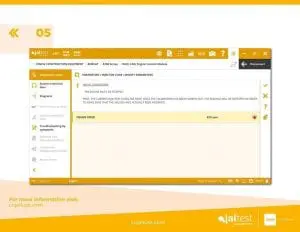
Step 5
On the next screen, you will be provided with initial conditions and instructions for what needs to be carried out to recalibrate the injectors for the ECU. In this case, we see the engine is still running and needs to be stopped and how the calibration will be performed.
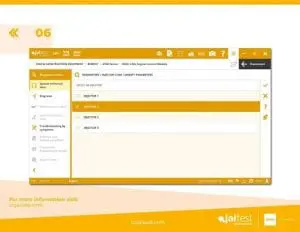
Step 6
Next, your tech will need to select the Systems Technical Data on the left-hand side panel in order to elect the injector he or she wishes to calibrate. A complete list of the number of injectors will appear. Select the correct one.
Step 7
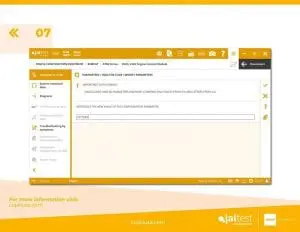
After selecting your injector, you can then put in the new configuration code in the Diagnostics Menu. This will introduce the new parameter to the ECU and allow your Bobcat to continue operating efficiently.
Learn More About Jaltest
If you found this guide helpful or want to learn more about Jaltest off-highway kits, then Triad Diagnostic Solutions has you covered. We also provide webinar training and guides for commercial diagnostic kits, agriculture equipment diagnostic kits, material handling equipment, and marine diagnostic tools. Give us a call today at (317) 939-3690.